|
The ncWMS is a Web Map Service (WMS) for NetCDF files that follow
the CF conventions
 .
If your NASA HDF data products of interest are not available via WMS by NASA data centers, you may want to set up your own WMS server using ncWMS by converting HDF/HDF-EOS into NetCDF via OPeNDAP HDF4 handler/HDF5 handler or H4CF conversion toolkit first and editing the converted file with NcML.
ncWMS is distributed in a single WAR (Web application ARchive) file. You can download here .
.
ncWMS requires the following software packages. Please install them first.
Installation is straightforward. Please follow the following three steps.
First, put the downloaded ncWMS2.war file under webapps directory of your tomcat installation. For example, if Apache Tomcat version 7.0.47 is unpacked at /tmp/apache-tomcat-7.0.47, put the ncWMS2.war file under /tmp/apache-tomcat-7.0.47/webapps/ directory.
Next, start your Apache Tomcat (e.g., run /tmp/apache-tomcat-7.0.47/bin/startup.sh) and the ncWMS web application will be deployed. If it is deployed successfully, you'll see a new directory webapps/ncWMS2/ being created.
Finally, open your web browser and type the URL http://myhost:myport/ncWMS2/ (e.g., http://localhost:8080/ncWMS2/). If installation is successful, you'll see a web page with four links as shown in Figure 1.
Congratulations! You're now ready to serve your data. If you have any problem with installation, please read the installation guide by the ncWMS team.
ncWMS can serve both local NetCDF and remote OPeNDAP files. In both cases, first click the Admin interface (requires longin) link from the main page (Figure 1). You will be asked to enter a username and a password. Enter admin for the username and ncWMS for the password. Then, you can see the admin interface page as shown in Figure 2.
Now you're ready to enter information under the Datasets section.This section assumes that you've successfully converted a local NASA HDF/HDF-EOS data to NetCDF file using H4CF Conversion Toolkit, HDF-EOS5 augmentation tool, and NcML. In this example, we'll use a MODIS NetCDF-3 file that h4tonncf tool in H4CF Conversion Toolkit has converted.
To serve a NetCDF (or NcML) file with ncWMS, you need to enter Unique ID, Title, and Location into the table under Datasets section in Figure 2. You can enter any unique number for Unique ID or text for Title. However, you should provide the exact path and name of the NetCDF file for Location. For example, we entered 1 for Unique ID, MODIS for Title, and /mnt/ftp/pub/outgoing/h4cf/data/nc3/MYD02HKM.A2012214.0005.005.2012214164436.hdf.nc for Location as shown in Figure 3. You may ignore other columns unless you want to provide some additional information about your dataset.
Once you entered the 3 key information about your file, press the Save configuration button. Then, the value in the State column becomes LOADING with a hyperlink. You can check the status of loading by clicking the hyperlink. If ncWMS successfully loads the file, the hyperlinked page will tell you that the state is ready as shown in Figure 4. Please note that the loading process may take long for a big file like MODIS.
Now, you can refresh your web browser that shows the ncWMS Admin page and you will notice that the value of State becomes READY without hyperlink as shown in Figure 5.
This section assumes that you've successfully installed Hyrax OPeNDAP server with HDF4 handler and HDF5 handler modules.
Serving remote OPeNDAP data is almost same as serving local NetCDF or NcML data. The only difference is to put an OPeNDAP URL in the Location column of the Datasets table in the Figure 5. For example, you can enter the following OPeNDAP URL of NASA OMI dataset from our Hyrax demo server.
2 for Unique ID, OMI for Title, and the sample URL in Figure 6. If you don't see any change, please make sure that you have pressed the Save configuration button and refreshed the web browser. Please note that ncWMS automatically changes the http to dods when it loads the remote OPeNDAP dataset.
After you finish entering dataset information, you can test ncWMS using the Godiva3 web interface. The Godiva3 interface comes with ncWMS so you don't have to download and install it separately. Please click the Godiva3 interface link from Figure 7. This will lead to a new web page as shown in Figure 8.
Click the OMI link under My ncWMS Server. It will expand the dataset and show all variables that you can plot. Click the ColumnAmountO3 and you will get the visualization of the variable on the map as shown in Figure 9. Please note that we adjusted the Overlay opacity from 100% to 75% to show the country borders of the map in Figure 9.
You may want to compare the plot in Figure 9 with the screenshot of Panoply, an OPeNDAP visualization client.
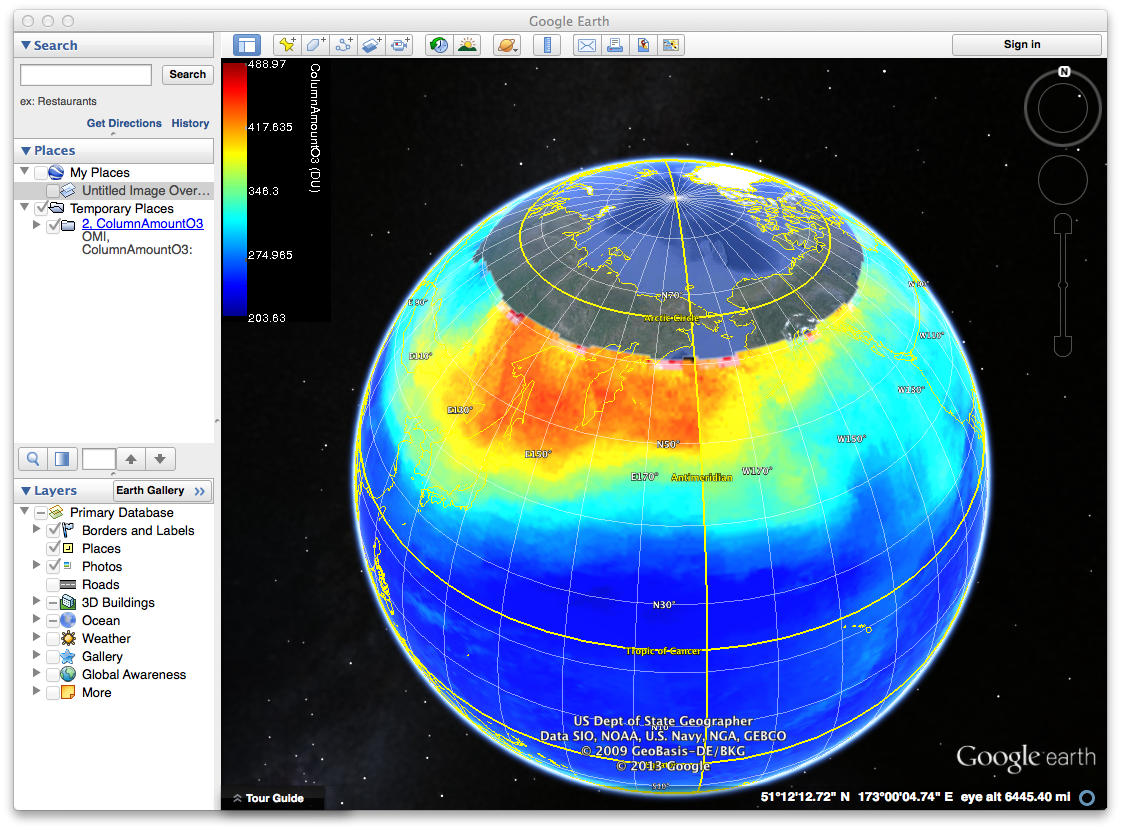
Finally, you can test ncWMS with Google Earth. Simply copy and paste WMS 1.1.1 Capabilities link from Figure 7 and follow our Google Earth WMS example. Figure 10 demonstrates that Google Earth can visualize our sample NASA OMI OPeNDAP data via ncWMS.
Please note that Godiva3 interface (Fig. 9) provides a hyperlink of Open in Google Earth that creates a KMZ file and allows users to download the KMZ file. We recommend this method of visualization over WMS in Google Earth because the KMZ includes variable name, colorbar, and unit information as shown in Figure 11.

Our demo ncWMS server is available here.